
Click here to see resulting photograph: Country Roads 1.
Note to Readers: As of 2020, I no longer own or use analog equipment but I hope you find this reference helpful.
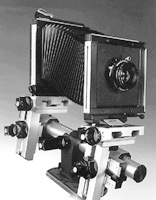 The Sinar P view camera: P stands for Perfection. The Sinar is what all the other view cameras
would
be... if they could. You can easily locate one on eBay, where there's an
abundant supply of used Sinar
equipment.
The Sinar P view camera: P stands for Perfection. The Sinar is what all the other view cameras
would
be... if they could. You can easily locate one on eBay, where there's an
abundant supply of used Sinar
equipment.
Everything is geared. Every adjustment is smooth and silky. There are very few locking mechanisms, since the gears are so well made, they just stay where you leave them. Made in Switzerland.
 The Sinar has asymmetric or
yaw-free movements. It stays in focus when you tilt, swing, rise and shift. With other view
cameras, you have to tilt, refocus, then raise or lower the camera - over and over
again. With the Sinar, you just focus and dial-in the adjustments until everything is right. It's
heavenly !
The Sinar has asymmetric or
yaw-free movements. It stays in focus when you tilt, swing, rise and shift. With other view
cameras, you have to tilt, refocus, then raise or lower the camera - over and over
again. With the Sinar, you just focus and dial-in the adjustments until everything is right. It's
heavenly !
The Sinar is a modular system camera. If you want to add or replace things, you can. Turn your 4x5 camera into a 5x7 or 8x10 camera ? No problem. Just replace the bellows and the back with a conversion kit, also called format change set, conversion set, etc. These kits are smaller, lighter and cheaper than cameras. Because Sinar was the workhorse of choice for so many professionals, there is plenty of used equipment to choose from, in excellent condition. Igor's Camera Exchange carries a lot of Sinar equipment and expertise.
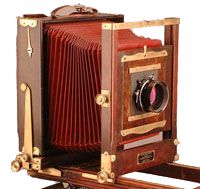 Another superb camera is the
5x7
Kodak 2D, a wooden field camera (left). I found mine at an auction
and had a new bellows put on. It works fine again. On the left you can see what someone else's fully
restored 2D looks like. It's the latest in 1920's technology
!
Another superb camera is the
5x7
Kodak 2D, a wooden field camera (left). I found mine at an auction
and had a new bellows put on. It works fine again. On the left you can see what someone else's fully
restored 2D looks like. It's the latest in 1920's technology
!
The 5x7 Kodak's light weight and folding design makes it great for carrying around. Unlike most folding cameras, the Kodak hybrid design lets you leave a lens on the camera at all times, which makes things easy and fast when setting up.
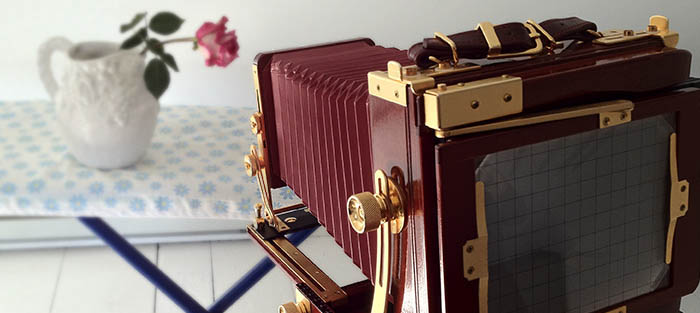
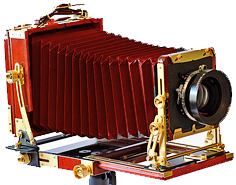 When maximum portability is required, consider the
4x5 Tachihara
Wooden Field Camera (right). It's very light and folds quite small. With its red bellows and brass
fittings, it attracts curiosity and draws onlookers like a magnet. Using a 200mm
Nikkor M lens, it's a treat to walk around and shoot a wide variety of subjects. You can save time
and economize space by leaving the lens on the camera, reversed.
When maximum portability is required, consider the
4x5 Tachihara
Wooden Field Camera (right). It's very light and folds quite small. With its red bellows and brass
fittings, it attracts curiosity and draws onlookers like a magnet. Using a 200mm
Nikkor M lens, it's a treat to walk around and shoot a wide variety of subjects. You can save time
and economize space by leaving the lens on the camera, reversed.
If you would like to see what some other Large Format cameras look like, have a look at this thread entitled Show Off Your Camera on the Large Format Photography Forum. You may be surprised to see how many people use them - and how many different kinds of Large Format cameras exist.
 Ordinary cameras have lenses
that are mounted straight
ahead, so they look straight ahead only. That's fine for many
subjects but view cameras let us adjust the plane of focus at the front and rear of the camera. We
can focus along a complex plane and make photos that are either impossible or
arduous with ordinary cameras.
Ordinary cameras have lenses
that are mounted straight
ahead, so they look straight ahead only. That's fine for many
subjects but view cameras let us adjust the plane of focus at the front and rear of the camera. We
can focus along a complex plane and make photos that are either impossible or
arduous with ordinary cameras.
Using a view camera, every lens becomes a tilt/shift lens. Every lens also gives rise, fall and swing. Since the rear of the camera can also be adjusted, the film or sensor itself can also be tilted, shifted, risen, fallen, and swung !
Click here to see some photos that were made using view camera movements. Some of these adjustments can be created after image capture with editing tools but not all. View cameras allow us to explore and combine adjustments creatively, while composing the image: something quite different from repairing mistakes in post-processing.
With focus-stacking, depth of field can be simulated but not necessarily along an oblique plane. Tilt/shift lenses are available in limited focal lengths, for certain cameras only. Tilt/shift adapters let us adapt lenses designed for larger sensors or film, but to get more extensive (but limited) view camera functionality with a digital camera, see the Cambo Actus and the Arca Swiss Universalis.
 For
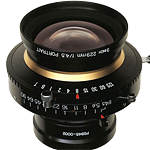
a discussion of some favorite lenses for Large Format cameras, click here. We
discuss vintage and
barrel-mounted designs, portrait lenses, modern lenses for use in the field - as well as macro and
process lenses, the Sinar Copal Shutter and a blur rendition or bokeh
and a 4-way bokeh comparison of vintage and modern designs.
For
a discussion of some favorite lenses for Large Format cameras, click here. We
discuss vintage and
barrel-mounted designs, portrait lenses, modern lenses for use in the field - as well as macro and
process lenses, the Sinar Copal Shutter and a blur rendition or bokeh
and a 4-way bokeh comparison of vintage and modern designs.
Included are sample image galleries for Rodenstock APO Sironar-S, Rodenstock Macro Sironar, Voigtlander Braunschweig Heliar, Carl Zeiss Jena Tessar, Fujinon A, Fujinon C, Fujinon T, Fujinon SFS, Nikkor M, APO Nikkor and more. You can see that differences between them are often... exaggerated.
 Here is a
family portrait sized at 32x40 inches, made from
a 4x5 negative.
Here is a
family portrait sized at 32x40 inches, made from
a 4x5 negative.
Here is a photo made with a 1930's Kodak 2D: the detail available from a 5x7 negative is impressive. An 11x14 print is barely a 2x enlargement !
Of course, 5x7 still falls short of 8x10: here's an 8x10 sample image with detail section - made with an 8x10 wooden field camera. It puts the smaller formats to shame.
 Here
is a brief tutorial on
Scanning Tips
with Epson flatbed scanners but it applies to any scanner we use.
Here
is a brief tutorial on
Scanning Tips
with Epson flatbed scanners but it applies to any scanner we use.
To make a digital image which looks as analog as possible - as smooth as possible - we need to work around some of the default settings provided by the scanning software.
With my consumer-grade Epson flatbed scanners, the green channel is slightly sharper than the red and blue channels. Read Scanning the Green Channel for Optimum Resolution to learn more.
 A
150mm lens needs 150mm of bellows draw - at infinity. As we focus closer, more bellows extension is
required and more exposure is required. How much more ? For
perfect exposure, we want to know. For a lens of given focal length and bellows with a specific
maximum extension, how close can we get to the subject ?
A
150mm lens needs 150mm of bellows draw - at infinity. As we focus closer, more bellows extension is
required and more exposure is required. How much more ? For
perfect exposure, we want to know. For a lens of given focal length and bellows with a specific
maximum extension, how close can we get to the subject ?
If we want a certain degree of magnification (say 1:3) and we know the focal length of the lens, how much bellows extension do we need ? With a lens of given focal length and a bellows of known maximum extension, how much magnification can we get ? At 1:1 magnification, a 150mm lens requires 300mm of bellows extension. How do we compensate for exposure as bellows extension increases ?
Click here for a page which provides formulas for bellows extension.
If you don't care to memorize the formulas for bellows extension and film reciprocity, consider this wonderful application for the iPhone: Reciprocity Timer by Pump Interactive. It really works !
 You will love Kodak
TMAX 100, TMAX
400 and Ilford
FP4+ and
HP5+
films. These films have long straight response curves, which means
they give realistic detail throughout the tonal scale. They also have a very linear response to
changes in development time, which makes them easy to use in both high and low
contrast lighting. If you are familiar with the Zone System, this means that they are easy to
"expand" and "contract" with changes in development. Ilford offers their film in a
wider variety of sizes than Kodak and at lower prices too.
You will love Kodak
TMAX 100, TMAX
400 and Ilford
FP4+ and
HP5+
films. These films have long straight response curves, which means
they give realistic detail throughout the tonal scale. They also have a very linear response to
changes in development time, which makes them easy to use in both high and low
contrast lighting. If you are familiar with the Zone System, this means that they are easy to
"expand" and "contract" with changes in development. Ilford offers their film in a
wider variety of sizes than Kodak and at lower prices too.
Tabular grain films like Kodak TMax and Ilford Delta have grain that is flat, or tabular - rather than round. The result is a cost savings for the manufacturer, because a thinner layer of Silver is required. Tabular films require more sensitizing dye and thus require longer washing times to remove the dye. Traditional films like Tri-X, Ilford FP4+ and HP5+ need less washing, because there is less dye to remove.

Ansel Adams, 1944
The formula for D-23 developer has only 2 ingredients but produces clean negatives with fine grain, excellent tonal separation and good film speed. It's so simple, you can mix it fresh every time. There's no need for a stock solution - nothing to expire on the shelf and surprise you. Click here for additional photographs and more information about D-23 .
Ansel Adam's classic image "Winter Sunrise from Lone Pine, 1944" was developed in D-23. See Examples: The Making of 40 Photographs page 164 to read more about his lovely photograph.
D-23 is a one-bath developer. It is not the same as Divided D-23 which is a 2-bath formula. Divided D-23 is also known as DD-23. Are you looking for Divided D-23 ? See this article.
You can make your own Odorless Stop Bath using Citric Acid. The Kodak SB-8 formula calls for 15 grams per liter, or 1/2 oz per quart. Or you can also use plain water for stop bath if you like. Using an acid stop bath, development is stopped instantaneously. Using water, it is stopped also, just not as abruptly. You can use a weak solution of Citric Acid: 1 teaspoon per liter. Citric Acid is very cheap, harmless and... odorless. In the USA, a good source for materials is Artcraft Chemicals.
| Ingredient | Stock | Working |
|---|---|---|
| Ammonium Thiosulfite | 800 ml | 160 ml |
| Sodium Sulfite | 60 g | 12 g |
| Sodium Metaborate | 5 g | 1 g |
| Water to make | 1 liter | 1 liter |
(If you use a Hypo-based fixer, you can easily make your own Washing Aid: just use a teaspoon of Sodium Sulfite per liter of water and toss it when you are done.)
According to Anchell and Troop, in The Film Developing Cookbook, Alkaline Fixers have the following advantages over more traditional Acidic formulas:
- Less danger of over-fixing
- Shorter washing times
- More archival
- Greater capacity
- More stable
- Can be formulated to have low odor.
The T-3 Alkaline Fixer formula is intended to be diluted 1+4. Instead of making stock, you can make a working solution by dividing the amounts by 5 (see table above).
It's fun - and far less expensive - to mix your own chemistry. Most classic formulas are available in books like The Darkroom Cookbook and online at digitaltruth.com. In the USA, a good source for materials is Artcraft Chemicals.
Kodak adds a magenta sensitizing dye to its TMAX films. Depending on your water and other factors, that dye can be hard to remove with ordinary fixing and washing. Do not prolong the time in the fixer: that will not remove the stain. Instead, rinse your negatives briefly in water after fixing, then soak them in a 1% solution of Sodium Sulfite for around 10 minutes (1 teaspoon per liter of water). Then rinse and wash normally.
Sodium Sulfite is the active ingredient in Film and Paper Washing Aid: if you use an acid fixer, you will need that anyway. If you use an alkaline fixer a washing aid is not required but a soak in Sodium Sulfite will remove the magenta stain if necessary. In the USA, a good source for materials is Artcraft Chemicals.
Some people purchase expensive custom equipment to wash their film. Nowadays, you can construct your own washer out of inexpensive and widely available materials.
 A
Dish Rack Film Washer
costs only a few dollars. Your film just soaks, in a bunch of standing water.
There is no need for a fancy syphon or drain system: Just let the film soak and replace the water
now and then. Save the water and let diffusion do the work for you. You can use a
similar technique to wash
roll film too.
A
Dish Rack Film Washer
costs only a few dollars. Your film just soaks, in a bunch of standing water.
There is no need for a fancy syphon or drain system: Just let the film soak and replace the water
now and then. Save the water and let diffusion do the work for you. You can use a
similar technique to wash
roll film too.
 Photo trays are great for developing prints but you can do things better - and cheaper - with items
available almost anywhere.
Plastic Food
Containers
are more affordable, use less chemistry, prevent scratches and require less
room. Once you try them, you will wonder why you ever used traditional "Photo Trays".
Photo trays are great for developing prints but you can do things better - and cheaper - with items
available almost anywhere.
Plastic Food
Containers
are more affordable, use less chemistry, prevent scratches and require less
room. Once you try them, you will wonder why you ever used traditional "Photo Trays".
 With an infra red viewing device you can have
a wonderful time developing, loading and unloading black and white film in the dark. You can see
everything, without fogging the film. If you're cramped into a small space,
there's no chance of knocking things over.
With an infra red viewing device you can have
a wonderful time developing, loading and unloading black and white film in the dark. You can see
everything, without fogging the film. If you're cramped into a small space,
there's no chance of knocking things over.
You can perform Development by Inspection (DBI), not in the old fashioned way (where you get only a brief peek under a dim green bulb) but throughout the entire process: development, stop bath, fix, etc. You can do tray development with ease, with far fewer scratches and with greater confidence that things are turning out right. This tool pays for itself - the first time you use it !
I previously used a monocular device called the ATN Viper but it is no longer manufactured.
Important Note: As development proceeds, the film looks darker and darker. If you examine only the emulsion side, you will get the erroneous impression that development has proceeded too far, too quickly. To determine development, do not judge the emulsion side. Examine the shiny side of the film. Be sure to practice before risking any important work and use your darkroom timer too.
If you handle film, wear gloves or make sure to keep your finger tips clean. It's easy and affordable to clean them with a bit of Isopropyl Rubbing Alcohol on a clean cloth or paper towel. Clean your fingertips before loading sheet film. Clean them before unloading and developing. Clean them before hanging film to try. Clean them before scanning film. You'll be glad you did !
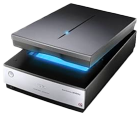 You can scan your negatives with an affordable flatbed scanner like the
Epson V850 and the Epson drivers which
ship with the scanner. A 4x5 inch negative, scanned at 2400 dpi (samples per inch), gives a 115
megapixel image. A 5x7 inch negative, scanned at the same resolution, gives a 200
megapixel file. Is that enough ?
You can scan your negatives with an affordable flatbed scanner like the
Epson V850 and the Epson drivers which
ship with the scanner. A 4x5 inch negative, scanned at 2400 dpi (samples per inch), gives a 115
megapixel image. A 5x7 inch negative, scanned at the same resolution, gives a 200
megapixel file. Is that enough ?
At such high resolution, image fidelity is very good and the tones are... rich ! Tiny JPG files, viewed on the monitor, just can't convey the feeling. An 11x14 image made from one of these negatives is truly lovely.
 Some photographers buy expensive cases and packs to carry
their gear. I prefer a canvas bag and a beverage cooler. The Sinar P folds down small enough to go
into the bag, upside down. The Sinar is built like a tank. The only thing it
needs, is a carrying strap and that's what the bag is for. Everything else goes into the
cooler,
which has a nice sturdy strap to go over your shoulder.
Some photographers buy expensive cases and packs to carry
their gear. I prefer a canvas bag and a beverage cooler. The Sinar P folds down small enough to go
into the bag, upside down. The Sinar is built like a tank. The only thing it
needs, is a carrying strap and that's what the bag is for. Everything else goes into the
cooler,
which has a nice sturdy strap to go over your shoulder.
The beverage cooler keeps the equipment cool in summer and warm in winter... How does it know ? Even more importantly, it looks like a beverage cooler, to anyone who might see it in the car. Some people like to flaunt the name of their camera, as a status symbol. I prefer the safety of my gear looking like nothing more than a case of soft-drinks.
Note the pipe insulation on the tripod legs, held on with duct tape. Pipe insulation is very light in terms of additional weight but vital when shooting in cold weather: it can keep your hands from freezing when you carry the tripod !
 Try this affordable and helpful Shutter
Speed app for the iPhone. It listens to your mechanical shutter and measures the actual
speed. It may not be as accurate as the (now discontinued) Calumet Shutter Tester
mentioned below but it's accurate enough. If you want to purchase an add-on light sensor, it
will
give you very accurate results.
Try this affordable and helpful Shutter
Speed app for the iPhone. It listens to your mechanical shutter and measures the actual
speed. It may not be as accurate as the (now discontinued) Calumet Shutter Tester
mentioned below but it's accurate enough. If you want to purchase an add-on light sensor, it
will
give you very accurate results.
I tested my old #4 Alphax Shutter with this app. The shutter is very close to its old-fashioned speeds of 1/2, 1/5, 1/10 etc. That's good to know !
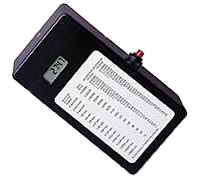 Thanks to Boston-based Architectural Photographer Peter Lewitt, you can see the manual for the
Fidelity
Calumet Digital Shutter Tester, which is no longer offered by Calumet Photo.
Thanks to Boston-based Architectural Photographer Peter Lewitt, you can see the manual for the
Fidelity
Calumet Digital Shutter Tester, which is no longer offered by Calumet Photo.
The Shutter Tester allows you to test the shutters on a variety of cameras and lenses. Even though it is no longer sold, you can click here to read the manual. Perhaps you can purchase one on the used market.
If you like to control the visual quality of your photos and you acquire equipment from others, it's nice to know how close it is to the correct speed.
 When
shooting black and white film, it's common wisdom to use a red or orange filter to darken the
sky
and
clear the haze. For certain
subjects this works very nicely but red and orange filters not only remove blue light from the sky:
they also darken the blue light in shadows and the green light in vegetation.
When
shooting black and white film, it's common wisdom to use a red or orange filter to darken the
sky
and
clear the haze. For certain
subjects this works very nicely but red and orange filters not only remove blue light from the sky:
they also darken the blue light in shadows and the green light in vegetation.
To avoid ink-black shadows and unnaturally dark vegetation, we can use a polarizer along with a yellow filter if required. Rotating a polarizer, we can control the amount of darkening in the sky according to taste, while maintaining a normal balance of colors in the rest of the scene. If we need even more richness in the sky and clouds, we can reach for a medium yellow or light orange filter and place it on top of the polarizer. That's how this image was made (on 8x10 film). Note the tones in the grass and the trees: the yellow filter has actually enhanced the details in the vegetation, not darkened them.