While other applications are catching up, I find the Photoshop and Lightroom subscription to be the best option for Fine Art photography. It's not the easiest or the cheapest, but it provides the most features and the best features. Other image editing applications are not subscription-based and seem more affordable at first but new versions require a new purchase.
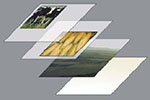
 The most important feature of Photoshop is layers. With layers we can make corrections, change their order and specify their intensity. We can apply adjustments on a layer that affects only the layer beneath it. Adjustments on layers are non-destructive: they can be enabled or disabled at any time.
With Lightroom and other tools which do not support layers, all of our edits are recorded in sequence: if we go back several steps we lose whatever we adjustments we have made in the meanwhile. With Photoshop layers, our creative process is entirely asynchronous: we are not locked in to the order in which we work. This compelling Photoshop advantage is demonstrated over and over in the following Photoshop videos.
These videos are at an intermediate level. Looking for introductory tutorials on Photoshop ? The free video series entitled 30 Days of Photoshop from PHLEARN is highly recommended ! Other great resources are PIXimperfect and the Photoshop Training Channel. Also see Julieanne Kost's blog.
Let's add a Black and White Filter layer to improve a color photograph: a surprisingly effective approach !
Some photographs look best in their original form, but let's experiment and create a digital image that is part photograph, part watercolor. Starting out with a suitable candidate, we process it using Dynamic Auto Painter. We choose settings which reduce detail and add an impression of paper texture. Next, we blend the original photo above it as a Photoshop layer.

Let's tone a monochrome image, using the Gradient Map feature in Photoshop. The creative possibilities are endless. For more methods of toning monochrome images, see Toned Monochrome Images with Photoshop and Additional Methods of Toning with Photoshop.
Let's apply a layer in Photoshop to emulate the soft-focus effect of a vintage portrait lens.
In this video, we use Gaussian Blur. Another option is to use the Lens Blur feature, which gives greater control over the shape and intensity of the blur. We can mimic the look of various lenses, apertures, etc.
Let's use the Smart Sharpen tool on a separate adjustment layer: a non-destructive approach. To mitigate any "over-sharpened" artifacts, we adjust the layer's Blend If property.
Let's improve the sky, using Photoshop's Sky Replacement feature. Then let's convert it to a smart object and apply further non-destructive adjustments.
Let's enhance the sense of depth in a photograph, using layers that have been converted to smart objects.
Let's brush-in our corrections... exactly where they are required.
Here's a remarkably fast and easy way to tone monochrome images.
Images from digital cameras with interchangeable lenses and scanned film are prone to dust spots. Removing spots can be troublesome and time-consuming. The Adobe Camera Raw Filter makes it much easier to find and remove spots from your images. This tool can be used with images of all types, not just raw files. It's perfect for tidying up sensor dust in areas like the sky, where spots are abundant but hard to discern.
Let's select and adjust the flower - but not the leaves - with the Photoshop Color Range tool. This method can be a vastly more effective than the usual object selection tools. We can modify areas according to their brightness range or color. Watch the video below and click here to read an illustrated article.
Let's select and adjust the sky - but not the buildings - with the Photoshop Color Range selection tool.