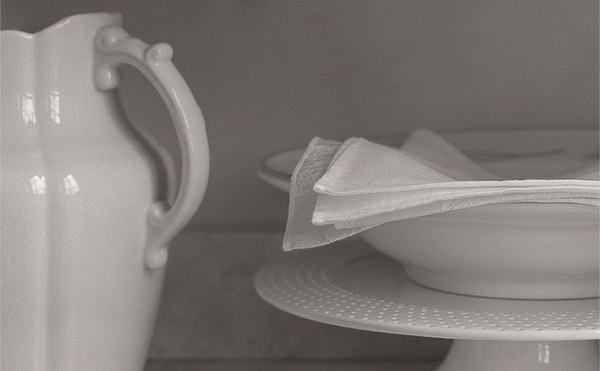
Scan of 4x5 negative
The image above illustrates the "analog" quality of a photograph that has been properly exposed, developed by inspection and scanned in a simple, straightforward manner. After the scan, only minimal manipulation in Photoshop was required.
Note to Readers: As of 2020 I no longer shoot, process or scan film but I hope you find this reference helpful.
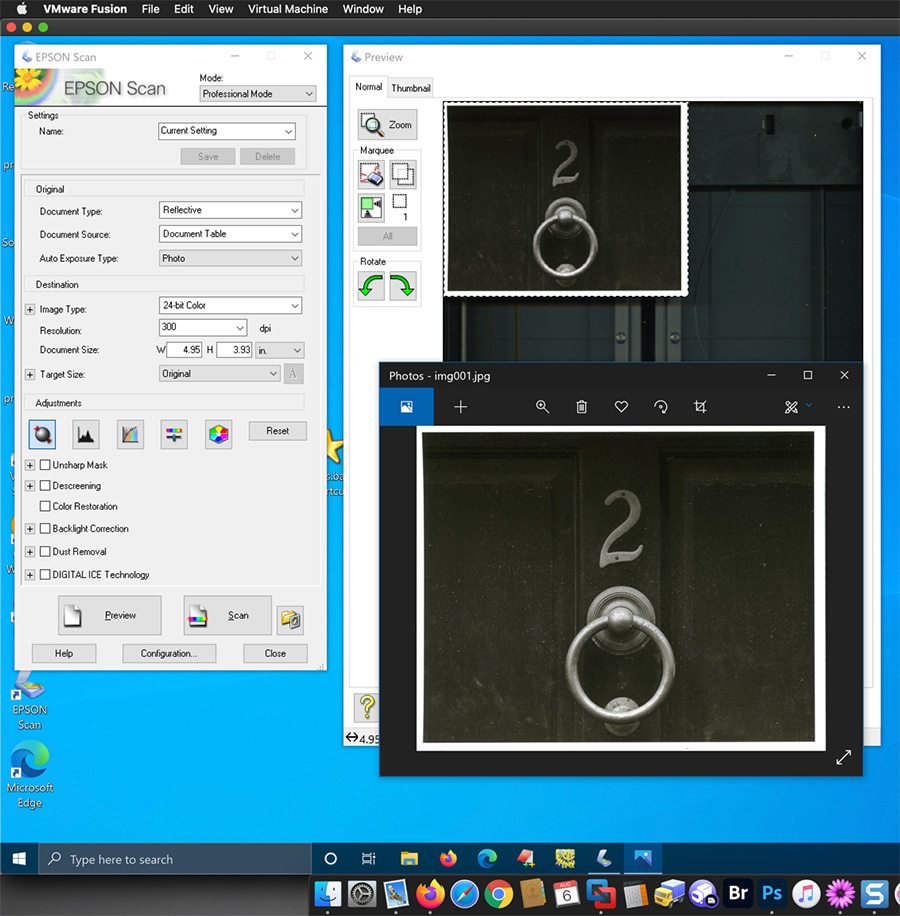
This article covers the older 32-bit version of the EPSON Scan software. It runs on Windows and MacOS prior to Catalina (10.15). The newer 64-bit version for MacOS is called EPSON Scan 2.
If you don't like the new 64-bit version for MacOS (EPSON Scan 2), you can run the older 32-bit EPSON Scan on Windows on your Mac, using a VM tool like Parallels Desktop or VMWare Fusion, as shown below.
Note that VMWare Fusion is now free for non-commercial use and supports both Intel and Apple Silicon machines.

Don't waste time and materials if your monitor is off. You should be able to
discern all 50 steps in this image. Be sure your monitor is properly
calibrated before you start scanning.

Above is a negative made on 5x7 inch Ilford FP4+ film. The subject is a pair of pink roses in overcast light. It's not the greatest photo in the world but it makes a good demonstration because the tones are fairly close and subdued.
(The taking lens for this photo was of vintage design, chosen for its circular aperture and neutral rendition of background blur: an old 180mm Carl Zeiss Jena Tessar. For more Tessar images, click here.)
The actual negative is rather soft in appearance: as the histogram shows, the tonal scale occupies no more than 40% of the scanner range. That's fine with this image. Photographs do not need to contain pure black or pure white, contrary to popular opinion, unless the subject contains them.
If a scan is good, the image should convey subtle nuances of shading. Or as my mentor Fred Picker used to say... "It should feel like light". In a picture like this, a faithful and delicate rendering of the subject is the photograph.

The default EPSON Preview settings have made the image appear quite harsh: the Input high values have been clipped and appear pure white - like chalk. Meanwhile, the overall Output has been constrained on both ends of the tonal scale: instead of 0-255, our image contains only 10-200. Now let's see how to make things look much nicer.

We have corrected the default Output settings. They now go from 0 to 255. We have adjusted the Input settings so that the dark values on the left side, are just dark enough to render the clear film edge as black - but no darker. The right-side setting is light enough to show the high values naturally, with no clipping or unnatural loss of texture. (These roses were pink. We do not want them to look pure white. Photographs are not required to contain pure white tones, or pure black.) The right slider is actually past the end of the histogram.
Finally, we can adjust the Gamma setting back to normal, namely 1.0. This should give us a "linear" scan with no disproportionate contrast curve applied but in actual practice we should use whatever Gamma value makes the image look best. Note that monitors are normally set to a Gamma of 2.2 or 1.8. Perhaps EPSON considers these as normal values: this is not a well-documented feature.
To bypass all automatic corrections, see How to Bypass Minimize Automatic Adjustments below.

The default VueScan Preview settings have made the image appear quite harsh: the White Point setting of 1 and the default Curve low and Curve high settings have clipped the low and high tonal values. Light gray tones appear pure white - like chalk. The dark tones have been forced to pure black. Adding to the problem, the default B/W vendor, B/W brand and B/W type have been chosen. Heavens! Now let's see how to make things look much nicer.

It's important with VueScan to not choose any of the film pre-sets because they result in automatic curve adjustments over which we have no control. Therefore choose GENERIC as the B/W Vendor. Choose COLOR as the B/W Brand.
Because we want to get a straight scan from VueScan, we need to adjust the Curve low and Curve high settings to 0, or as low as they can go. Having these settings at Zero will ensure that the extremes of the density curve are not clipped unless we want them to be.
We have lightened the image a little, by increasing the Brightness level to 1.06. It's just enough to let the image feel like natural light.
To bypass all tonal corrections, see How to Bypass Minimize All Tonal Adjustments below.
The Preview feature has let us adjust the scanning settings, so our scan will get us as close as possible to a faithful rendition of this negative.
We set the scanner to give us a 16-bit greyscale TIFF file. Unlike JPEG (which is "lossy"), the TIFF format results in no loss of visual information. (TIFF stands for Tagged Indexed File Format. JPEG stands for Joint Photographic Experts Group.) For color negatives and slides we use 16-bit color - also known as 48-bit color - because each of the Red, Green and Blue channels get 16 bits.
It's easiest if we scan at the highest resolution we'll ever need. That way we have one master scan file, to which we can refer later. We can make smaller versions for printing or displaying on the web, but those should be separate files. Never sharpen the original master file, since sharpening is a destructive operation. And don't sharpen when scanning, for the same reason.
It's best to sharpen our images last.

In our editing tool (Photoshop) the image looks pleasing and natural. To tone the image in Photoshop with a warm but subtle color, we can apply a non-destructive Color Fill or Photo Filter according to taste. We can do the same thing in GIMP with the Colorize tool.

Against a white background, the image feels different than when against the black background of the scanner software. Depending on our choice of matting and frame, we may decide to adjust the tones of this photograph a bit further.
Finally, we save the file in the Photoshop PSD format, which uses lossless compression. The file is smaller than the original TIFF but no quality is lost. To post this image on the internet, we can always make a JPG file later (8-bit only) but our working file is in PSD format, at full 16-bit depth.
 When we open an 8-bit grayscale image for editing, we start out with only
256 possible shades to work with and we proceed to lose data with each adjustment. When
we convert to JPG format, we may lose even more shades. By the time we're done, some of our photos may
have that unnatural "digitized" look, with gaps in the tonal scale. Some people call
this banding. With 8-bit color images, we can quickly get banding in each of the 3
color channels.
When we open an 8-bit grayscale image for editing, we start out with only
256 possible shades to work with and we proceed to lose data with each adjustment. When
we convert to JPG format, we may lose even more shades. By the time we're done, some of our photos may
have that unnatural "digitized" look, with gaps in the tonal scale. Some people call
this banding. With 8-bit color images, we can quickly get banding in each of the 3
color channels.
It's much better to work in 16-bit mode if we can. We start out with 65,536 shades of grey. Even if we lose half of them, we still end up with a smooth image. In color, this is really 48-bit mode, since each of the Red, Green and Blue channels gets 16 bits.
Some writers suggest that because consumer-grade printers and monitors are currently limited to 8-bit only, there's no need to scan at higher bit depth. That approach only makes sense if we're never going to edit our images, because banding is introduced as soon as we start making corrections in 8-bit mode.
Also note that some printer software like Quadtone RIP allows us to print on EPSON printers at 16-bit quality. It's not the printers which limit us, but rather the consumer-grade driver software.
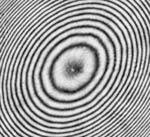 EPSON film holders do a good job of keeping
the film flat. Because the film sits above the glass, they also prevent
Newton's Rings: concentric lines caused by interference.
However, EPSON film holders crop the image and being shiny, they cast reflections onto the edges of the
image. To avoid these problems we can use a holder from BetterScanning.
EPSON film holders do a good job of keeping
the film flat. Because the film sits above the glass, they also prevent
Newton's Rings: concentric lines caused by interference.
However, EPSON film holders crop the image and being shiny, they cast reflections onto the edges of the
image. To avoid these problems we can use a holder from BetterScanning.
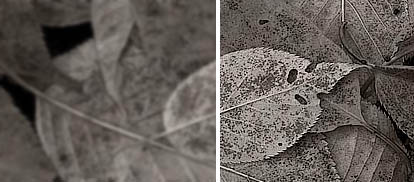
With either EPSON or BetterScanning holders, the scanner automatically sets focus to a few millimeters above the glass, but BetterScanning holders are adjustable so you can find best focus. For a personal sample of how the BetterScanning holder improves focus over EPSON's holders, see my before and after images here. For Better Scanning's comparison samples, click here.
If you don't need the highest resolution from the scanner, another option is to tape the film directly on the glass and use the EPSON "Film Area Guide". If we place the film emulsion-side down, Newton's rings are less likely to appear: this varies with choice of film. When we use the Film Area Guide the scanner focuses at the level of the glass. I use blue painter's tape which comes off easily.
We have gotten an image that feels like soft natural light. Very few further adjustments will be needed in Photoshop, Lightroom, etc. Because every digital manipulation distorts the image in one way or another - even the so-called "non-destructive" adjustments - the fewer the better.
To preserve the natural "analog" quality of the original negative, we scanned the image in 16-bit monochrome and saved it in a lossless file format. The 16-bit format gives us 65,536 shades of grey to play with, to reduce any banding, clipping, or other digital artifacts which may arise if we make further adjustments.

To get the sharpest scan of a B&W negative on an EPSON scanner, we can scan in 48-bit color but use only the Green channel. We save the data from the Green channel as a 16-bit Grayscale image and toss away the rest. See Using the Green Channel Only.
Do we have to use the green channel only ? No. Only if we are trying to squeeze every last pixel of resolution from the scanner. Fortunately with Large Format film, that is rarely the case: we usually have more detail than we need.
Does this apply to all scanners ? Probably not. I have not tested other scanning equipment. High-end scanners costing a lot more money probably do a better job of focusing each of the color channels but on a consumer-grade flatbed like the EPSON, this is what I have found. Perhaps this is due to the use of a Bayer array sensor, which contain twice as many Green pixels as Red and Blue.
![]() We choose the scanning resolution, depending on how much we plan to enlarge the
original.
We choose the scanning resolution, depending on how much we plan to enlarge the
original.
At typical viewing distance, people with normal vision can discern roughy 6 line pairs/mm, or 12 dots/mm. There are roughly 25mm in an inch, so 25 x 12 dots = 300 dots in an inch. Standard print quality is therefore referred to in the USA as a "300 line screen", namely 300 dpi (dots per inch).
If we scan at 300 ppi (pixels per inch) we can make a print at the same size as the original. If we scan at 600 ppi, we can make a print which is twice the size of the original. If we scan at 900 ppi, we can make a print which is 3 times the size... etc.
Let's say we have a medium format negative which after cropping is 2x2 inches. We want to make a 10x10 inch print. That means we plan to enlarge by a factor of 5. In that case, we need to scan at a minimum of 300 x 5 or 1500 ppi.
Let's say we have a 4x5 slide and we want to make a 12x15 inch print. That means we plan to enlarge by a factor of 3. In that case, we need to scan at a minimum of 300 x 3 or 900 ppi.
Let's say we have an 8x10 negative. We want to make an 8x10 inch print. That means we don't plan to enlarge at all. In that case, we can scan at a minimum of 300 x 1 or 300 ppi.
If you feel that 300 dpi is too close to the minimum, scan at a higher resolution. It's up to you. Depending on the image, you may not be able to see the difference. If it has a lot of fine detail, you probably will.
Some conscientious people like to distinguish between pixels per inch (ppi) and dots per inch (dpi). Strictly speaking, pixels are related to digital image capture and display, while dots are germane to printers and prints.
For the puropses of this article, the two terms can be used interchangeably.
| Film Size | Useable Size | Size @ 1600ppi | Size @ 2300ppi |
|---|---|---|---|
| 4 x 5 | 3.75 x 4.75 | 44 MP | 90 MP |
| 5 x 7 | 4.75 x 6.75 | 78 MP | 162 MP |
| 8 x 10 | 7.75 x 9.75 | 185 MP | 381 MP |
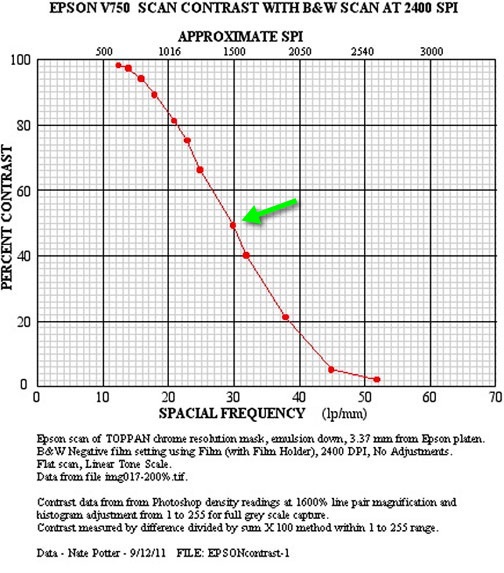
By the time we reach 1500 ppi, image contrast is already down to 50%. Fifty percent contrast is a typical cutoff point when evaluating usable resolution of camera lenses. As we move beyond the 2400 ppi setting, contrast for this scanner drops to its bare minimum, effectively zero.
According to this article at filmscanner.info, the EPSON V700 delivers 2300 ppi. They base this number on how many lines they can distinguish when scanning a USAF resolution target. At 2300 ppi, the lines can barely be distinguished. In other words, effective contrast drops very close to 0 once we pass 2300 ppi, just as Nathan Potter's diagram illustrates. For this reason, I never exceed the 2400 ppi setting. Beyond that number we are wasting our time and resources.
See Evaluating the Effective Resolution of Scanners for another study which shows the same basic results. The author observes a modest improvement when scanning at higher resolution and then down-sizing. If we really need more resolution, it's probably best to shoot larger film or purchase a better scanner.
| Film Size | 6X Enlargement | Size @ 300dpi |
|---|---|---|
| 4 x 5 | 24 x 30 inches | 62 MP |
| 5 x 7 | 30 x 42 inches | 108 MP |
| 8 x 10 | 48 x 60 inches | 248 MP |
If we're shooting on a tripod, or hand-held at a very high shutter speed, these prints will be critically sharp: someone can walk right up to the photo, examine it quite closely and there will be detail as fine as the naked eye can detect.
With 35mm or medium format film a consumer-grade flatbed scanner like the EPSON is inadequate for enlargement past 6-8X. For smaller formats, we need a dedicated film scanner, a drum-scanner or a high-end flatbed... which is another discussion.
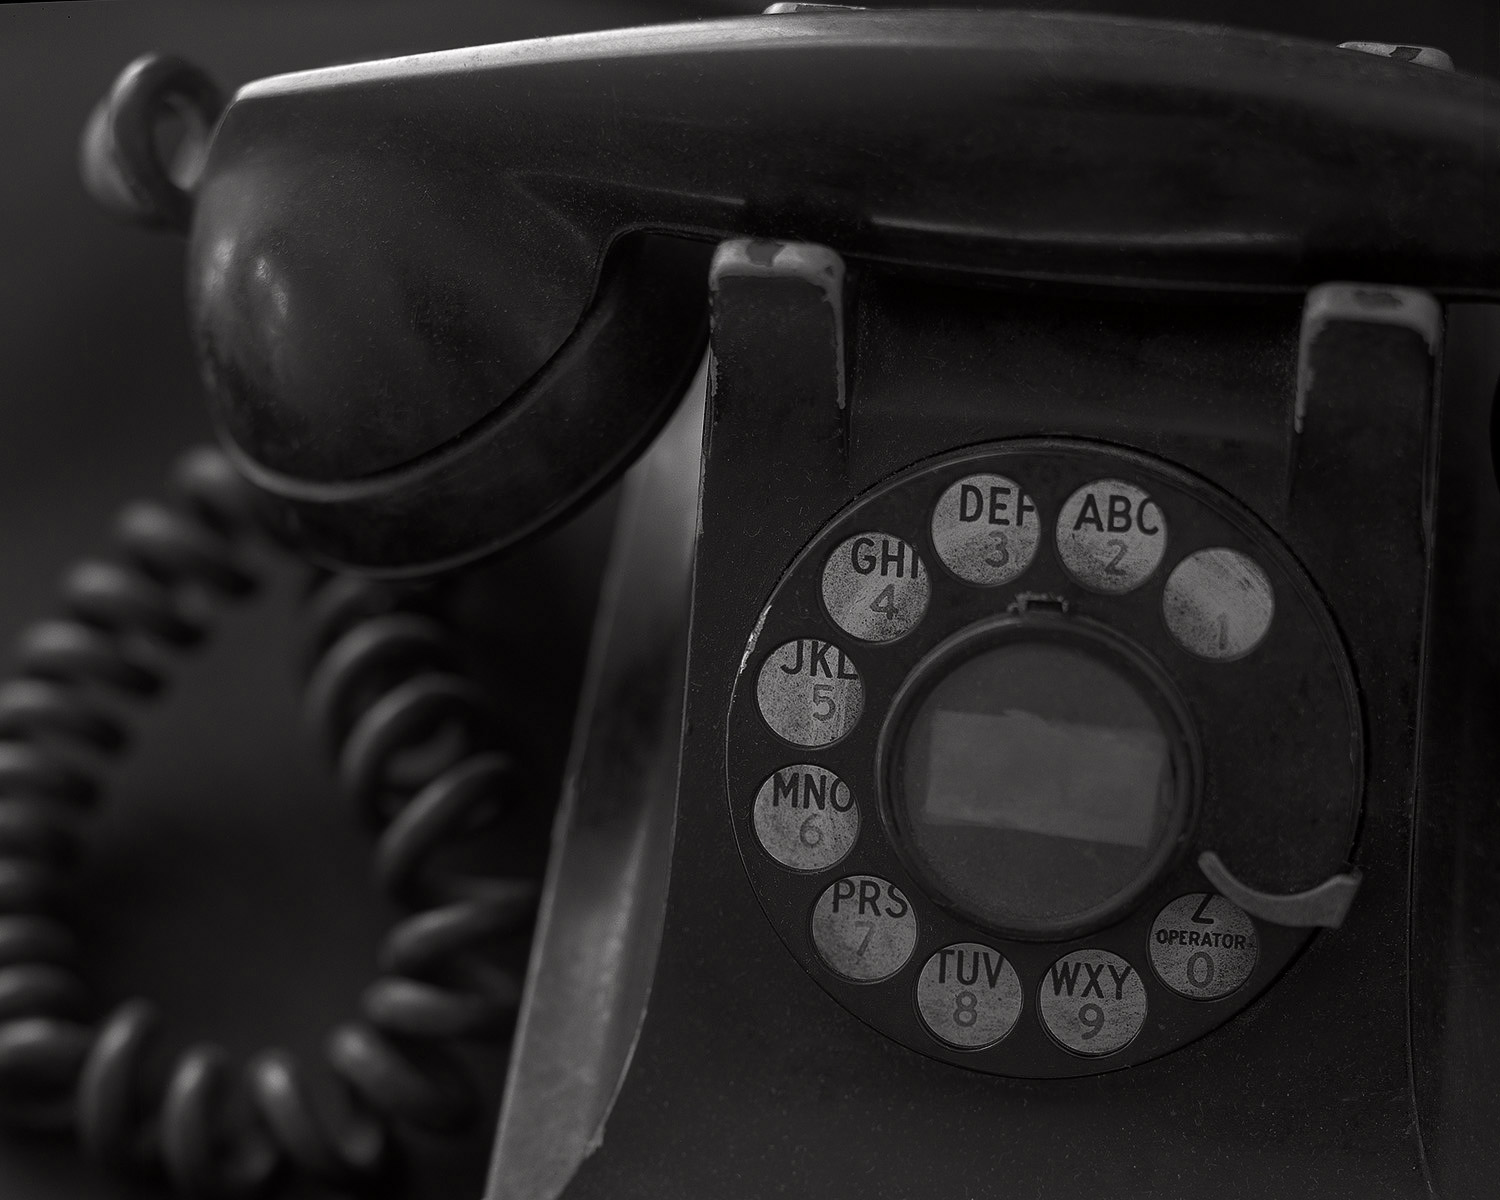 Here's a photo printed at 32x40 inches (80 x 100 cm) at 300 dpi. It
was scanned at 2400 ppi with an EPSON V700 from a 4x5 negative: Kodak TMY film developed in
D-23.
Here's a photo printed at 32x40 inches (80 x 100 cm) at 300 dpi. It
was scanned at 2400 ppi with an EPSON V700 from a 4x5 negative: Kodak TMY film developed in
D-23.
The taking lens was a 70-year old Carl Zeiss Jena Tessar and the enlargement is almost 10x. Even so, there is no grain and the in-focus areas are tack-sharp. You can see small particles of dust and hair on the telephone that were previously invisible to the human eye. You can see the photo here.
So while theory is good, there's nothing like practice. Some images print well at all sizes, some do not. Some images can be enlarged further or printed at lower dpi and still look sharp. Finally, competent sharpening is an important skill: it allows us to print at lower dpi or make larger prints.
 There are many ways to sharpen an image. Entire
books have been written on the subject. Here's a simple method that works for monochrome as well as
color. It helps eliminate the distracting visual artifacts we often see with unskillful sharpening:
halos, stepping, banding, etc.
There are many ways to sharpen an image. Entire
books have been written on the subject. Here's a simple method that works for monochrome as well as
color. It helps eliminate the distracting visual artifacts we often see with unskillful sharpening:
halos, stepping, banding, etc.
Read Selective Sharpening in Photoshop for a quick and effective method that lets us avoid digital artifacts and preserve the beauty of analog capture.
Some images appear sharp automatically. They enlarge better. With less sharpening, they look more natural. For further explanation, see Two Barns: One Sharp, One Not ?
Some advanced practitioners prefer to apply all adjustments in an image editing tool, not during the scanning process. It's impossible to bypass all adjustments because digitization is involved but there are several ways to drive the scanner with minimal adjustments to the tonal curve. Be sure to scan in 16-bit depth and save the file in TIFF format so that any subsequent adjustments made in editing software will avoid banding.
If you would like to follow the same approach with your digital camera raw processing, see Linear Profiles for Natural Tones.
VueScan provides the Raw file option. To get an unaltered scan - where even a default Gamma correction is not applied - use VueScan and click the Raw file option on the Output tab.

If we scan a reflective target, the resulting image will look dark and soft. In our editing tool, once we apply a Gamma 2.2 correction the image will look correct.
If we scan a transparency, the resulting image will look dark and soft. In our editing tool, once we apply a Gamma 2.2 correction the image will look correct.
If we scan a negative transparency, the resulting image file will not be inverted: it will still be a negative and will appear light and soft. We need to apply a Gamma 2.2 correction, then invert the image.

Open the Configuration page and select the option No Color Correction.

Another approach is to simply configure the settings as shown below. The resulting image will have no tonal adjustments, except for an automatic conversion to Gamma 2.2. Note that the Tone Curve Viewer is perfectly straight, indicating a linear scan.

macOS provides Image Capture: a generic scanner driver with extensive options for resolution and bit-depth. When we make the scan and choose "Image Correction: none", minimal tonal adjustments are performed. If we scan a positive, an automatic conversion to Gamma 2.2 is applied. To scan in 16-bit depth, choose "Thousands of Grays".
If we scan a negative, the resulting file we be a positive, but we will need to apply a 2.2 gamma correction.

Windows 10 provides Scan: a generic scanner driver with limited options. Transparency scanning (slides, negatives) is not supported: only reflected images like prints and printed pages can be scanned. When we make the scan, minimal tonal adjustments are performed, except for an automatic conversion to Gamma 2.2. Unfortunately, this driver provides limited controls over image quality. The resulting files are limited to 8-bit depth: 8-bit monochrome, 24-bit color etc. The resolution is also limited to a lower number than the EPSON scanner can actually provide.
It's not designed for fine-art scanning but for typical office work it's effective, easy to use and free.


For our serious work, it's a good idea to scan at a higher resolution than we need. We can always down-size the image to print at whatever size we like. The only problem with this approach is that we end up with large files, which are expensive to store. Nowadays we can purchase an affordable external storage device. It's safer than leaving them on the computer itself, which is more subject to failure and accidental deletions in the long-run. I store my photos on an external storage device and copy that every day to a second backup device. On my Mac, I use Carbon Copy Cloner.
RBG files are 3 X the size of Grayscale images. To save room on your storage device, don't save your monochrome images in RGB. Just save them in 16-bit B&W. When it's time to print, you can always convert to RBG and add a Color Fill layer for toning purposes.
If you shoot raw files with your digital camera, you may not be aware that typical raw profiles automatically "enhance" your photos by crushing the high and low tones. They clip the toe and shoulder of the brightness curve by several stops. They also "adjust" the color saturation. Your camera is probably recording more information than you realize.

When converting from raw, you can follow a similar approach to proper film scanning. See Linear Raw Profiles for Natural Tones
There is no advertising here: just a lot of free information. If you feel that this information has been helpful to you, please consider giving a small donation to support it. Any amount will be gratefully accepted !