Executive Summary: Almost everyone who does rigorous film testing ends up shooting at roughly one f/stop slower than box speed for normal development: 200 for HP5+ and TMY, 50 for FP4+ and TMX, etc. The more important issue is determining the development times which work for you. Even then, if your results are substantially different from others, you're probably doing something wrong.
Unless your water is impure, your thermometer is off or your agitation is unusual, the times given by the manufacturer are probably very close. Back in the glory days of film, testing got a lot of attention but with correct metering, why should there be much of a difference between you and all the others who use any particular film/developer combination ?If we want to be very precise, we can shoot TMY and HP5+ at 250 instead of 200 and FP4+ and TMX at 64 instead of 50 but these differences represent only small fractions of an f/stop: they are smaller than our ability to accurately meter a typical scene. Given the inaccuracies of our light meter, thermometer, water, agitation etc., the "one f-stop lower than box-speed" rule is a perfectly adequate approach.
What follows is a simple method of film testing which does not require a densitometer but supports both scanning and darkroom workflows. Whether you use a spot meter or an incident meter, the same principles apply.
Note to Readers: As of 2020, I no longer use film but I hope you find this article helpful.
 Pick a day when there are no clouds and no wind. Find a scene that is in partial sun and partial shade.
Find a person who can serve as a model or find a way to shoot your camera remotely, using either a timer
or long cable release - and be your own model.
Pick a day when there are no clouds and no wind. Find a scene that is in partial sun and partial shade.
Find a person who can serve as a model or find a way to shoot your camera remotely, using either a timer
or long cable release - and be your own model.
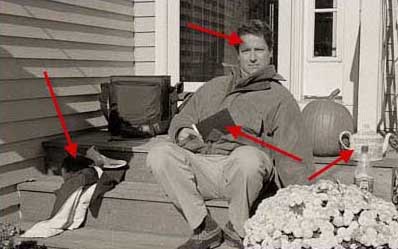
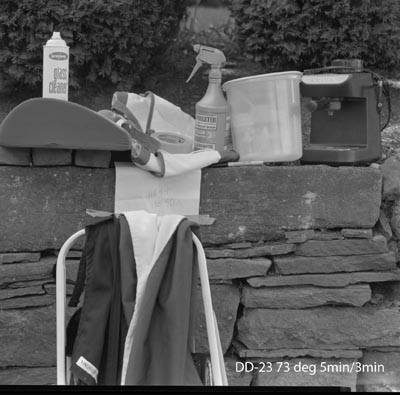
Assemble a collection of well-known articles of differing textures and colors. Be sure to get something dark and something light. Place them in the shade and in the sun.
The test image should contain recognizable tones and a human face is helpful for that - because our brain specializes in reading faces. Faces are much better than standard gray cards (see below).
Place some glass, some wood, some cloth in the scene. Let the scene be close to home, so that you can return to compare the print and subject later on if you want.
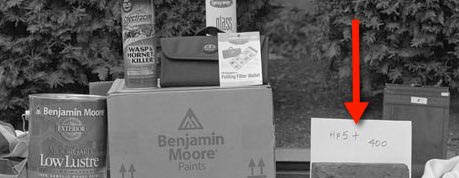 Get some pieces of plain white paper and a wide marking pen and make a set of 3 labels. Place a label in every shot.
For example, let's say we are going to test HP5+ 400 film. Make a label that says "HP5+ 400". Another will say "HP5+ 200". Make another that says "HP5+ 100".
Make sure that the lettering is large, so you can read them later when you compare the results.
If we shoot too close, the lens is extended and delivers less light to the film. To avoid issues of exposure compensation, see Formulas for Bellows Extension. It's best to shoot at infinity or close thereto.
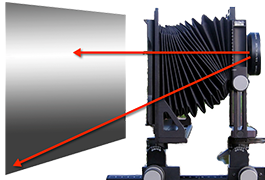 If we use a very short lens, the illumination will be uneven - so the exposure will be uneven. That's because the distance from the lens to the film will vary. It will become impossible to judge correct exposure or development.
Make sure the lens is of normal length, or longer.
If we use view camera movements, the illumination may be uneven - so the exposure may be uneven. The distance from the lens to the film may vary. It will become impossible to judge correct exposure or development. Make sure the lens is centered.
Set up everything in advance. We want to take all the photos in a quick succession so that the light is exactly the same for each photo. Practice if you like but when it comes time to take all the photos, do them quickly. If you want to test indoors, you can do that if you must, but it's best to test a natural scene and come up with a film speed/developer time which looks most like natural light. To repeat: we want the result which feels most like light.
Choose one lens and stick with it for all the exposures. It should be the lens you use most often. If it's a fairly modern lens, the actual shutter speeds will probably be very accurate. Even if it's an old lens, if the shutter is in fair condition it will probably be pretty accurate.
According to my Calumet Electronic Shutter Tester, this is most often the case. If you like, test your shutter - or have someone test it for you - and find out for yourself. But choose one shutter speed and stick with it for all the exposures. Pick a common speed like 1/60. Don't use 12 and 3/4 seconds unless that's your usual shutter speed.
We only change the f/stop, since that is always accurate: f/16 is always 1 stop away from f/11.
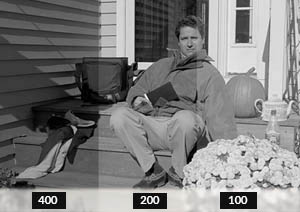 If you don't believe that the actual film speed is 1/2 the speed marked on the box, you can shoot the same scene at 3 different film speeds. Set your light meter to the speed recommended by the manufacturer. Let's say we're testing Kodak TMY 400 and we get an exposure of 1/200 second at f/22. Place a label that reads "TMY 400" in the
scene, in a prominent location. Expose 3 identical sheets.
If you don't believe that the actual film speed is 1/2 the speed marked on the box, you can shoot the same scene at 3 different film speeds. Set your light meter to the speed recommended by the manufacturer. Let's say we're testing Kodak TMY 400 and we get an exposure of 1/200 second at f/22. Place a label that reads "TMY 400" in the
scene, in a prominent location. Expose 3 identical sheets.
Now open the lens by 1 stop, to f/16 and replace the label with the one which says "TMY 200". Shoot 3 sheets at this setting.
Now open the lens another stop, to f/11 and replace the label with the one which reads "TMY 100". Expose another 3 sheets.
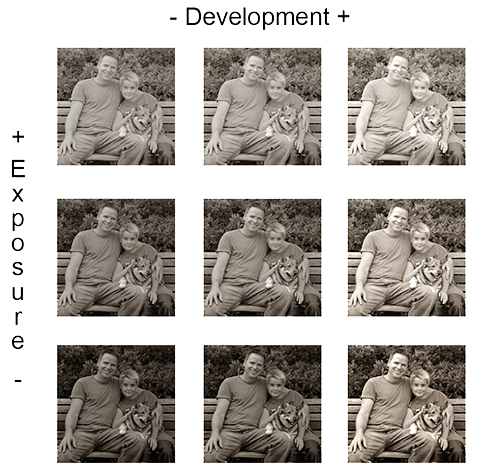
So far, we have made 3 sets: One at the manufacturer's recommended speed, another overexposed by 1 stop and another overexposed by 2 stops. You can test ISO 800 if you like: make a shot at f/32. If you want to be more rigorous, you can shoot more sets, varying by 1/2 stop, or 2 stops: it's your decision.
 We now have 3 sets of shots: one set for each film speed. We want to develop one sheet from each set for
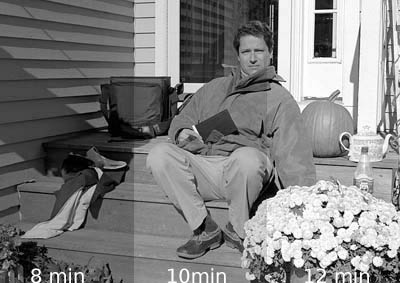
a different length of time. If your developer has recommended time of 10 minutes at 70 degrees, develop one set for the recommended time of 10 minutes, another set for 8 minutes and another set for
12 minutes. Or, you can try 9,10 and 11.
We now have 3 sets of shots: one set for each film speed. We want to develop one sheet from each set for
a different length of time. If your developer has recommended time of 10 minutes at 70 degrees, develop one set for the recommended time of 10 minutes, another set for 8 minutes and another set for
12 minutes. Or, you can try 9,10 and 11.
If you prefer to test more rigorously then choose 5 different times, placing the recommended time of 10 minutes in the middle. It's up to you.
The trick here is to keep track of which ones have been developed for how long. That's for you to decide. If you have an Infra Red Viewing Device you can see things in the darkroom and that can make life easier, but it's not a requirement. People have gotten along just fine without them for well over a century.
 If you work in the darkroom, make a set of prints on Number 2 paper
(or with a Number 2 filter), giving just enough exposure for the clear film edge to be as black as the
paper allows. Develop your paper with a standard dilution of your favorite paper developer, for a normal
duration. Use fresh chemistry and develop each print for the same time, such as 2 minutes in Dektol.
If you work in the darkroom, make a set of prints on Number 2 paper
(or with a Number 2 filter), giving just enough exposure for the clear film edge to be as black as the
paper allows. Develop your paper with a standard dilution of your favorite paper developer, for a normal
duration. Use fresh chemistry and develop each print for the same time, such as 2 minutes in Dektol.
If you have a cold light source, also known as a diffusion light source, then you shouldn't see any difference between a contact print and an enlargement, but if the enlarger has a condenser head or a collimated beam, the difference will be pronounced: high values will be blocked due to the Callier Effect.
My mentor Fred Picker demonstrated this well-known principle conclusively, back in the early 1970's. Compelling illustrations are documented in his classic text Zone VI Workshop. For further discussion and a link to a PDF version of the book, see Natural Tones in the Darkroom.
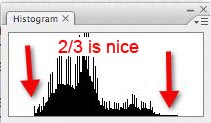
If you scan your negatives, then make sure your monitor is calibrated and scan your negatives in such a way that the entire range of brightness on the film is within the range of the scanner. I recommend that the entire curve of the film occupy 2/3 of the range of the scanner. This gives you 33% to play with: around 16% at each extreme. In the parlance of the Zone System, it means that you can play with around 1.5 zones at either extreme if needed.
 You can always add contrast in an editing tool, but if the negative is already too contrasty for the
scanner, you're out of luck, or you have to resort to multi-scan and merge techniques from the world of
digital sensors and their low tolerance for dynamic range. So it's best to live well within their
limitations and away from the extremes, where "noise" and other distortions appear.
You can always add contrast in an editing tool, but if the negative is already too contrasty for the
scanner, you're out of luck, or you have to resort to multi-scan and merge techniques from the world of
digital sensors and their low tolerance for dynamic range. So it's best to live well within their
limitations and away from the extremes, where "noise" and other distortions appear.
In Photoshop, GIMP or your other favorite image editor, add a linear adjustment layer so that the black film edge is rendered at 0% brightness and so that the high values are rendered correctly. Be sure not to clip any values. Do not introduce any curves: just a straight-line adjustment.. For information about scanning see Scanning Tips (with EPSON and VueScan Software).
Find the image which feels the most like light, throughout the entire range of tonality. You want the shadows to be dark but still contain sufficient detail. You want the high values to look clean and white but still have some texture. You want the human to look like a human. You want white paint in the sun to look like white paint in the sun but not bleached out. Grey socks should look middle grey. That's the film speed/developer combination which we will use for normal lighting and expect normal results.
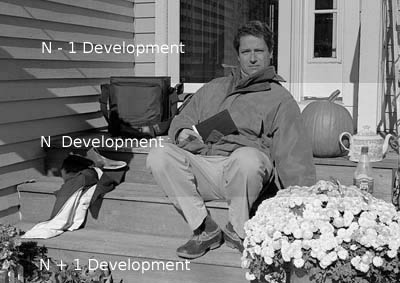 You will also find that one of the film speed/developing times looks best for a "minus-one" development
time: The shadows will be normal, but the high values will still be one stop too low. Similarly, you
will find a combination of film speed and development time that works nicely for "plus-one": the shadows
will look normal, but the high values will be a bit too high, by around 1 stop.
You will also find that one of the film speed/developing times looks best for a "minus-one" development
time: The shadows will be normal, but the high values will still be one stop too low. Similarly, you
will find a combination of film speed and development time that works nicely for "plus-one": the shadows
will look normal, but the high values will be a bit too high, by around 1 stop.
With these times, you can handle many lighting situations that arise: high contrast and low contrast. If you want to perform more testing, you can determine the best times for N-2, N+2, etc.
Be aware that when we under-develop film, we lose some speed in the process. So (to follow our example) you might have to shoot TMY at a speed of 100 when you lower the contrast by 2 stops, IE with N-2 development. In the same way, if you increase the development time enough to expand contrast up to N+2, you may need to shoot TMY at 300 or higher. Everything is... interconnected.

Antique Typewriter photographed with 180mm Fujinon SFS (soft focus) lens on 5x7 film